

-
Inquiry-Based learning versus Hands-On Learning.
Throughout the course of my educational journey, I’ve often encountered novice teachers conflating inquiry-based learning with hands-on learning. The majority of them categorize all hands-on pedagogical activities as inquiry-based learning. This stems from a misunderstanding of the differences and commonalities between the two instructional strategies. Hence, there is a need for rigorous identification of each one.

Teachers must realize that inquiry-based learning is a pedagogical approach that has its roots in scientific methods. It urges kids to transform a problem into an investigable question. They then navigate this question by formulating a hypothesis. Next, they gather information and conduct experiments. They collect data and analyze the results. Finally, they evaluate and draw conclusions. This process may be repeated at any point in the investigation process until kids reach a reasonable solution. Afterwards, they communicate their findings to the targeted audience. At each stage of inquiry-based learning, children’s innate curiosity drives them to continuously ask questions. They investigate to construct meaning and satisfy their thirst for knowledge. The investigable problem arises from a daily life observation, a provocative statement, an area of interest, teacher-generated prompts, etc., and hence the type of inquiry differs according to the level of complexity.
On the other hand, hands-on learning refers to any type of learning where students learn by doing. It involves actively participating in the learning process. Yet, in this type of learning, students can be doing their learning without investigating a problem and trying to find its solution. This type of learning involves activities that actively engage kids in the tasks. Examples include working with manipulative, building structures, and doing experiments. It does not necessarily include structured inquiry components.
Moreover, it is crucial to note that the two instructional strategies overlap. Inquiry is a form of hands-on learning in which the learner acts as a scientist. However, during many aspects of hands-on learning, students actively engage in the learning process without wearing the “inquirer hat” by asking “WHY?”, “How?” and “What if?” questions.

I understand the conflict at the level of novice teachers. Both hands-on learning and inquiry-based learning are built on the principle of learning by doing. Now that teachers realize inquiry-based learning has the scientific method at its base, it is easier for them to differentiate. Hands-on learning lacks this foundational connection.
As aforementioned, kids can go through a hands-on activity without having the mind-on part that triggers students’ critical thinking. Thus, inquiry-based learning transcends hands-on learning by empowering students to act like scientists. Still, many teachers are reluctant to embrace inquiry-based learning. There are mainly two factors for this. First, their educational background. These teachers studied with traditional teaching techniques and haven’t experienced inquiry-based learning as students. Second, teachers feel furious at the unexpected questions they face during inquiry-based learning. Some of these questions challenge teachers. In the course of my educational journey, I have encountered many teachers who, directly after being inspired by the inquiry strategy in a particular professional development program, adopted inquiry in their classrooms. Then these same teachers drifted back to the comfort zone of traditional teaching approaches. Here, they were less likely to face unexpected, off-script questions from students. They were more likely to have students controlled by them. But is this what we seek from education?
On the bright side, it is good to mention that many experienced teachers use inquiry-based learning in tandem with hands-on learning. This is a great opportunity for students. The hands-on part plays a significant role in revealing their misconceptions while they investigate the topic at hand.
Finally, the educational system must empower teachers to embrace and integrate inquiry-based learning. Especially “open inquiry,” due to its positive impact on students’ learning.
-
5 steps to make asynchronous learning student centered interactive learning.
Distance Learning has become the prevailing mode of learning for the majority of students during the pandemic. The two forms of distance learning are asynchronous learning and synchronous Learning.

Many people, after experiencing the synchronous learning for the previous two years, believe that it is beneficial. Especially if teachers plan and implement interactive sessions with the 5 E model and active learning strategies such as the Kagan strategies . On the other hand, many parents and students still consider asynchronous learning an ineffective learning and they classify it as assignments that must not introduce new concepts. How can we as educators change this misunderstanding?
What are the 5 steps to make asynchronous learning student centered interactive and effective learning?
Plan for asynchronous learning using the 5 E model.
# 1- Engage students using an interactive tool Google slide, Padlet, Jamboard, etc. by a brainstorming question.
Catch your students attention from the start. Post something they are curious about and interested in. Let them Brainstorm for the posted question in one place using any of the above tools. Your students will get inspired by their friends interaction!
#2- Push your students to explore the concept at hand.
Provide your students with online resources that help them explore safely. This can be: online articles, videos, recorded sessions, animations, stimulations, online games. etc. You can ask them to work individually or as team. They can record their findings on any of the the interactive tools listed above.
#3 Now it is the time to explain.
Who can do this part? The teacher, the student or any educational material can do this part.
You can provide students with a place to post their questions in the go. Afterwards, you can either ask for peer help to answer the questions or you can do it yourself. It is education! Always Light a fire!
#4 Here, comes the best part where you have to elaborate on the studied concept.
Extend and elaborate by connecting the concepts to daily life situations. Also, you can differentiate and elaborate based on students need and interest! Students exploration will inspire you in this step!
#5 Finally, the evaluation part.
Actually, I see this part in every step. It is an ongoing process that will help students in their learning and will help you to modify your teaching.
But , who said, you are the only one who will do this part?! Always think of self evaluation and peer evaluation!
Until my next blog, happy learning!
Neyoulla
-
A Neuroeducational Key to Sustaining Student Engagement
While reviewing a paper on neuroeducation research, I encountered findings that link dopamine secretion—a neurotransmitter associated with reward—to the levels of uncertainty and unpredictability in the learning process. To sustain student engagement for extended periods, much like the effect of electronic games, we may need to focus on inducing dopamine release by increasing unpredictability in the learning process. As an experienced educator, I recommend critically examining several routines practised by teachers worldwide. For instance, beginning each session by explicitly stating the learning objectives may amplify predictability. Additionally, the reliance on repetitive drills to ensure students achieve preassigned learning outcomes and the use of structured inquiry—which many educators consider a “safe zone” in their teaching when compared to other levels of inquiry, such as open inquiry—could also reduce the potential for unpredictability. This calls for a reevaluation of contemporary learning theories and their relationship to teaching strategies. By doing so, we may unlock new approaches that not only enhance learning outcomes but also make the educational journey more enjoyable for students. Next time you prepare your lesson plan, or ask ChatGPT for a lesson plan, consider adding to your prompt ways to increase the elements of unpredictability to enhance student engagement.
-
Experiential Learning: Connecting Chemistry Curriculum to Context!
The Chemistry of Crystallization: Connecting Science and CultureIn the 7th grade Lebanese chemistry curriculum, one of the central topics in the chapter on separation techniques is crystallization. According to McGraw-Hill, crystallization involves separating a solid-phase precipitate from a solution, melt, vapor, or another solid phase. The concept is introduced in the Lebanese student book through an image of a salt marsh, illustrating the natural crystallization of salt within sea beds.
Why This Chapter?
You may wonder why I chose this specific chapter or why I focused on the image of the salt marsh. Let me pause here and invite you to observe these photos:
- Grade 7 Chemistry Book Image: The textbook includes a generic image of salt pans but does not specify its location or cultural significance.
- Natural Crystallization in Anfeh: A stunning example of salt formation observed during my recent trip to the salt marshes in Anfeh, a town in the Koura district of North Lebanon.
- Close-up View of Crystallization: A detailed look at the intricate salt crystals forming naturally in the Anfeh salt marshes.
- Anfeh’s Functioning Salt Pans (‘Melle7at’): A centuries-old practice that continues to thrive along Lebanon’s coastline.
While the student book references salt pans, it makes no mention of Anfeh or Lebanon’s rich heritage in this industry. Generations of students have likely studied this chapter without knowing that Lebanon’s coastline has been a hub for salt production for centuries. Just a small addition to the textbook could create a meaningful connection between students’ learning and their cultural heritage.
Bridging Education and Emotion
Educators agree that emotion is integral to learning. Cognitive skills such as critical thinking and problem-solving are enhanced when learning resonates with students on a personal level. Including examples from daily life, or using photos and videos, can help students connect emotionally to the material.
Imagine if schools organized field trips to local salt pans, where workers could demonstrate the salt production process. Students would witness firsthand how the principles of evaporation and crystallization are applied in a real-world context. Such experiences not only enhance understanding but also instill pride in Lebanon’s cultural and scientific heritage.

Grade 7 Chemistry Book 
Natural Crystallization in Anfeh: A stunning example of salt formation observed during my recent trip to the salt marshes in Anfeh, Koura district, Lebanon. 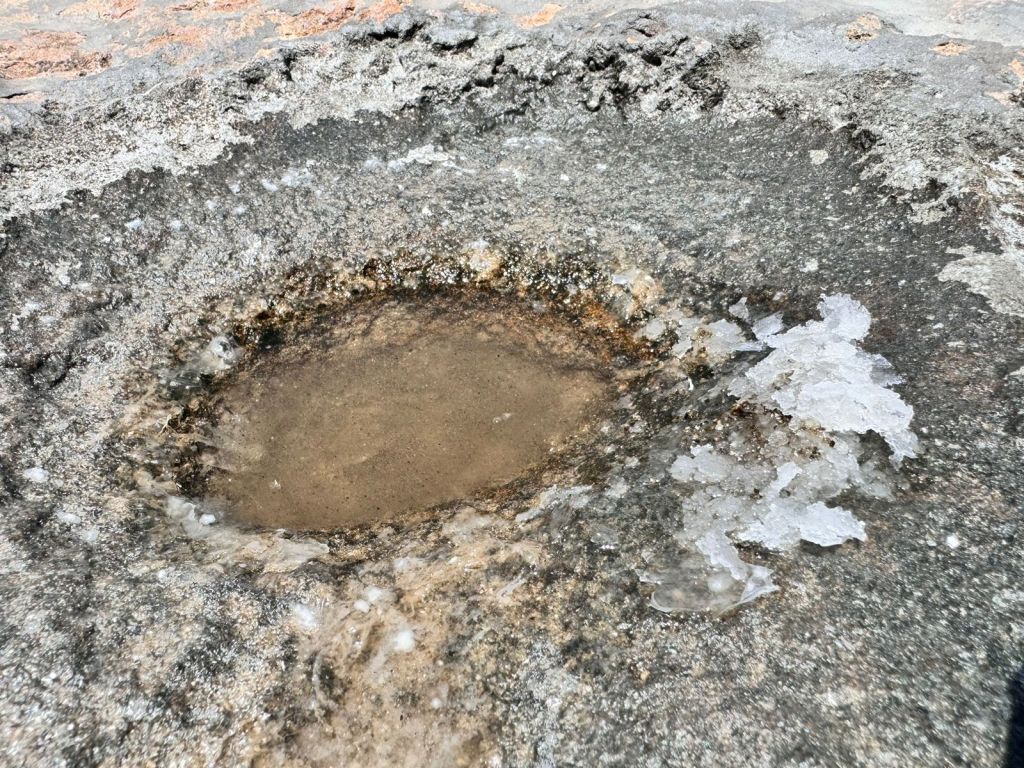
Close-up View of Crystallization: A detailed look at the intricate salt crystals forming naturally in the Anfeh salt marshes, Koura district, Lebanon. 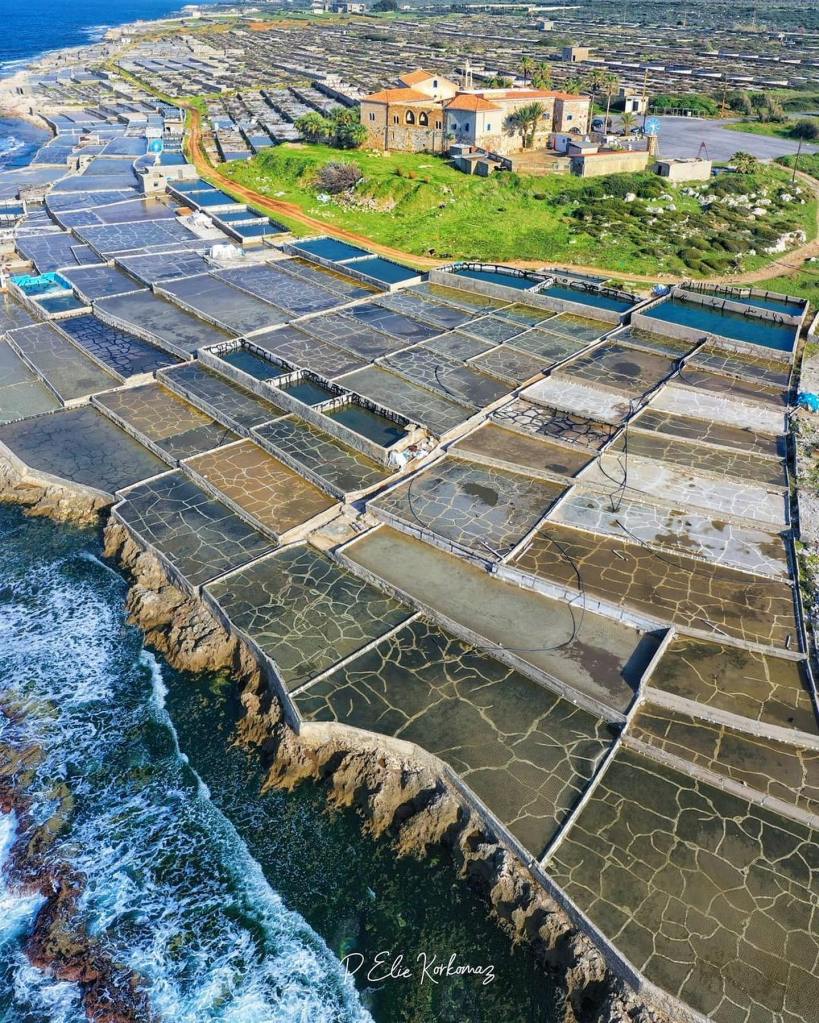
Anfeh functioning salt pans, or ‘melle7at’ as they are known locally The History and Science of Salt Production
Lebanon’s coastline has long been a center for salt production. The salt basins, known locally as ‘salinas’ or ‘melle7at’ (ملاحات in Arabic), were ingeniously designed to harvest salt from seawater using the sun’s heat.
The process begins with seawater, which contains approximately 3.5% salt, being channeled into shallow ponds. Under the heat of the sun, the water evaporates, leaving behind salt crystals. This natural demonstration of evaporation and crystallization principles highlights the ingenuity of ancient salt producers.
While modern salt production has advanced with technology, the core principles remain the same. Salt is still harvested from seawater and underground deposits using methods that rely on evaporation and crystallization. Each grain of salt represents a blend of natural processes and centuries-old human ingenuity.
Hands-On Learning Activity
Want to experience this process yourself? Try this simple activity at home:
- Dissolve table salt in warm water.
- Pour the solution into a shallow dish.
- Place the dish in a sunny spot.
- Over the next few days, observe as the water evaporates, leaving behind salt crystals.
This hands-on experiment offers a glimpse into the ancient art of salt production and makes abstract concepts more tangible.
A Call to Action
The next time you sprinkle salt on your food, remember the journey it has taken. It travels from the ocean, through the salt pans, to your table. Reflect on the cultural and scientific legacy behind this essential mineral. How does understanding its story change your perspective on everyday items?
Let us advocate for an education system that connects learning to our life and honors our cultural heritage. By embedding real-life examples into the curriculum, we inspire students. They will value their local traditions and engage more deeply with their studies. Whether you are a parent or an educator, take the time to explore these connections and share them with the younger generation. Together, we can make learning both meaningful and memorable.
-
Mastering Link Sharing in Zoom Meeting:
Sharing links via Zoom meetings is quite simple. Still, many novice teachers and learners who are new to Zoom struggle to manage it smoothly. Here are some tips and tricks to avoid common mistakes:
- Prepare links in advance: Have your links ready to copy and paste before the meeting to avoid delays.
- Provide clear instructions about the link shared in the Zoom chat before sharing it.
- Inform learners that clicking the link will cause it to open in a new window. It is advisable to include a screenshot in your primary presentation demonstrating how the link will open.
- Inform participants that they can return to the Zoom session by navigating back to the Zoom application. This can be done on their desktop, browser tab, or phone screen. It is imperative that they are aware of how to alternate between the link and Zoom.
- Provide clear expectations: Ensure that students are aware of the requirements upon accessing the link or application. Give explicit instructions about what is expected of them in the resource being shared (e.g., a form, quiz, or website).
- Clarify your expectations by posting a screen shot in the main presentation. Use it to visually guide them on where and how to interact with the link.
- Show the time allotted for this activity. You can use the timer from the Zoom app.
- Inform the learners about the product you expect from them.
- Inform the learners about the way the product will be revealed to the instructor or to the attendees.
-
Hurray! It’s publication day!🎉
I am thrilled to announce the release of our research publication on the impact of experiential learning on students’ problem-solving and affect in science, published with Sage Publishing and Journal of Experiential Education. Our paper, titled “Experiential Learning in Upper Elementary Science Classrooms: Influence on Students’ Problem-Solving and Affect in Science” underscores the impact of Experiential Learning- innovative curricular approach on students’ cognitive and affective development.https://doi.org/10.1177/10538259241265964
(more…) -
Science Wonderland
On a sunny day following a wintry storm, I took a stroll with the family kids to a nearby forest.
Upon reaching our destination, I was astonished by a captivating sight on the ground that resembled a giant hand. Taking a closer look, it became evident that this scene was a natural phenomenon, devoid of human intervention. Before unveiling the science behind the image, I invite you to observe it well and try to decipher the natural phenomena that caused it. After which, we will delve into the marvels of science behind its creation.
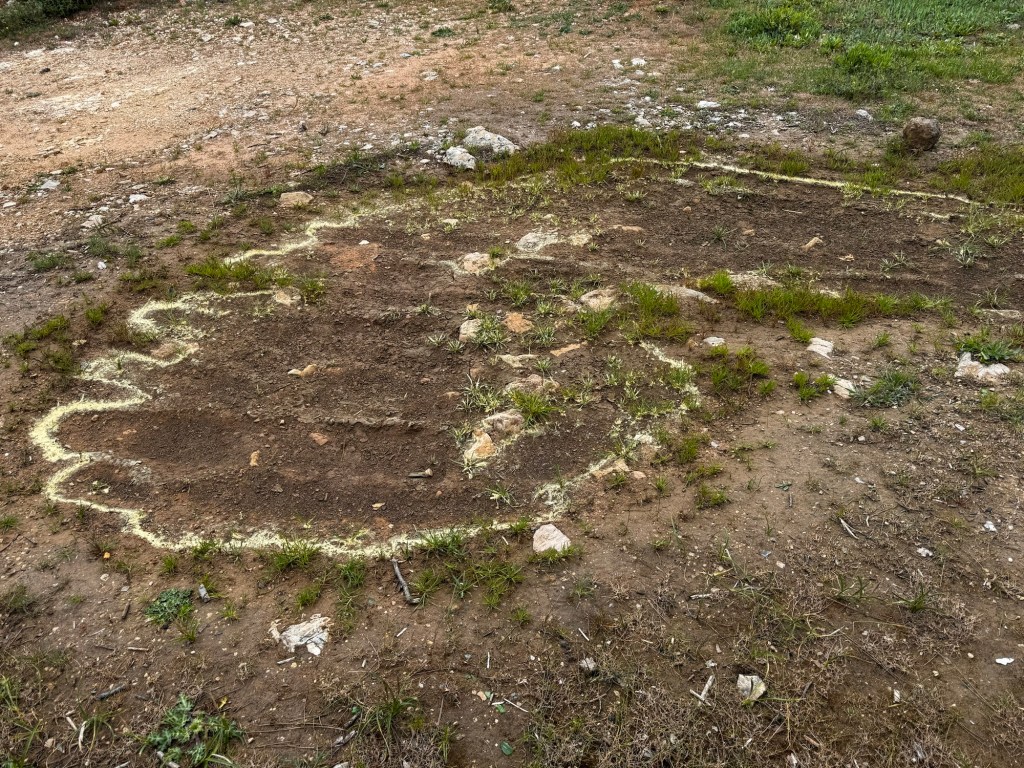
The Giant Hand
It took me a few moments to realise the science behind it. This was once a spot full of water, with yellow powder in it. When water evaporated on sunny days, it resulted in the formation of a yellowish edge encircling the perimeter.
You may ask yourself: “ What is the source of this yellow powder?”
Being in the forest, I directly related it to the tree pollen. To confirm my hypotheses, I shake the branches of the nearest tree, and the yellow pollen spreads from it like magic, verifying the mystery behind the natural scene.
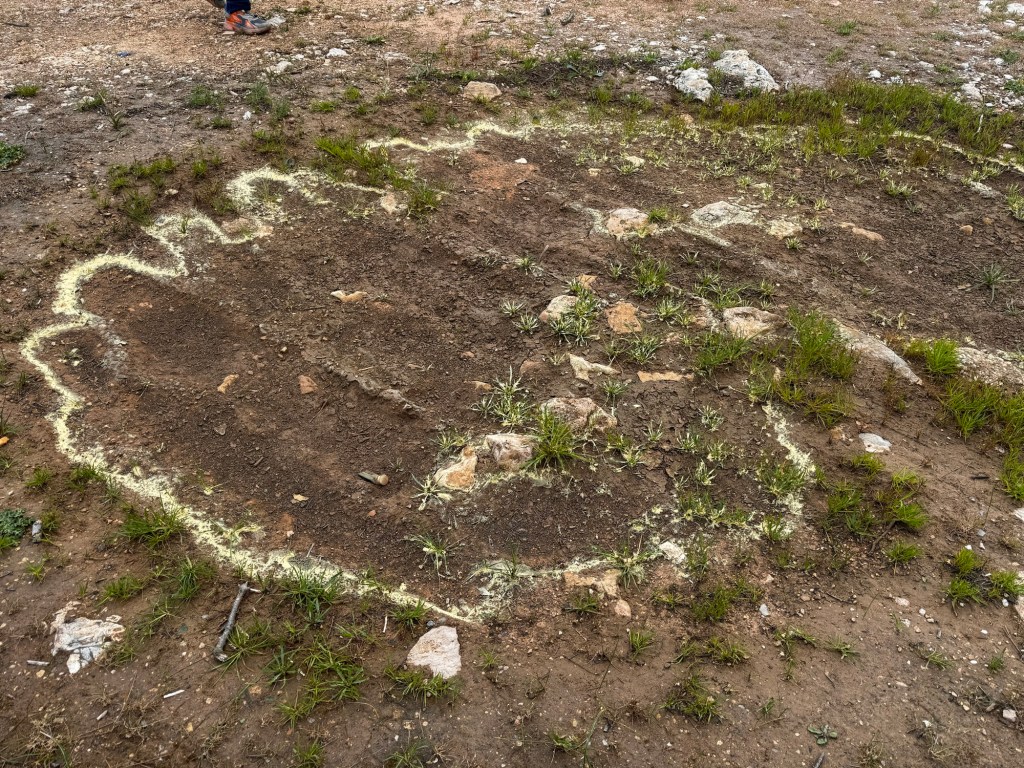
A closer look at the giant hand

Pollen Shower As parents, let’s step into nature’s classroom with our children, where every walk becomes a lesson, and every discovery a story. Let’s trade screens for the wonders of the natural world, where the simplest scenes hold the greatest mysteries waiting to be unraveled. Together, let’s nurture a curiosity for the world around us and ignite a passion for learning that extends far beyond the confines of a screen. Let’s create memories that last a lifetime and instill a love for nature that will flourish for generations to come.
As teachers, let’s break free from the confines of the classroom walls and invite science to dance under the open sky. As educators, let’s guide our students beyond textbooks and into the realm of firsthand experience. Encourage them to touch, smell, and observe the wonders of the natural world, sparking curiosity and inquiry with every step. Because true learning isn’t confined to four walls, it flourishes in the vast expanse of nature’s classroom, where every observation leads to a question waiting to be explored and investigated.
-
Chemistry in the kitchen!
What is lemonade?
Lemonade is a refreshing, sour-sweet beverage that is made up of water, lemon juice, and sugar. We commonly drink it on hot summer days to refresh and quench our thirst.
How do I prepare lemonade step by step?
Lemonade is usually prepared at home in one of these two ways:
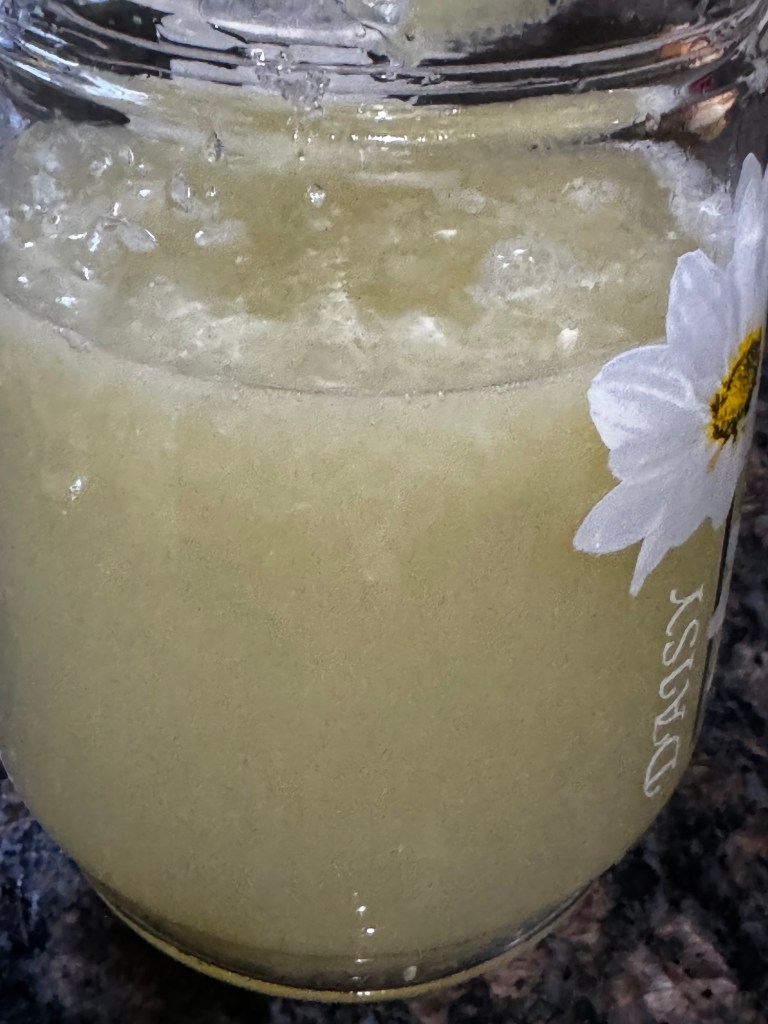
Freshly prepared Lemonade
First way:
1- Cut 6 lemons into halves.
2- Squeeze the lemons with a citrus juicer or squeezer.
3- Pour your juice into a container with 1/2 cup sugar.
4- Add 4 cups of water.
5- Stir well till the sugar dissolves completely.
Afterwards, add the ice cubes to your fresh juice.
(more…) -
Physics at Home!
I reside in a chilly mountainous region that relies on stoves to beat the winter cold. This winter, I got a new Olmar, a diesel-powered heating machine. As fuel prices in our country (Lebanon) are escalating, I wanted to assess fuel consumption per operating hour, thereby gaining insights into its budgetary needs.
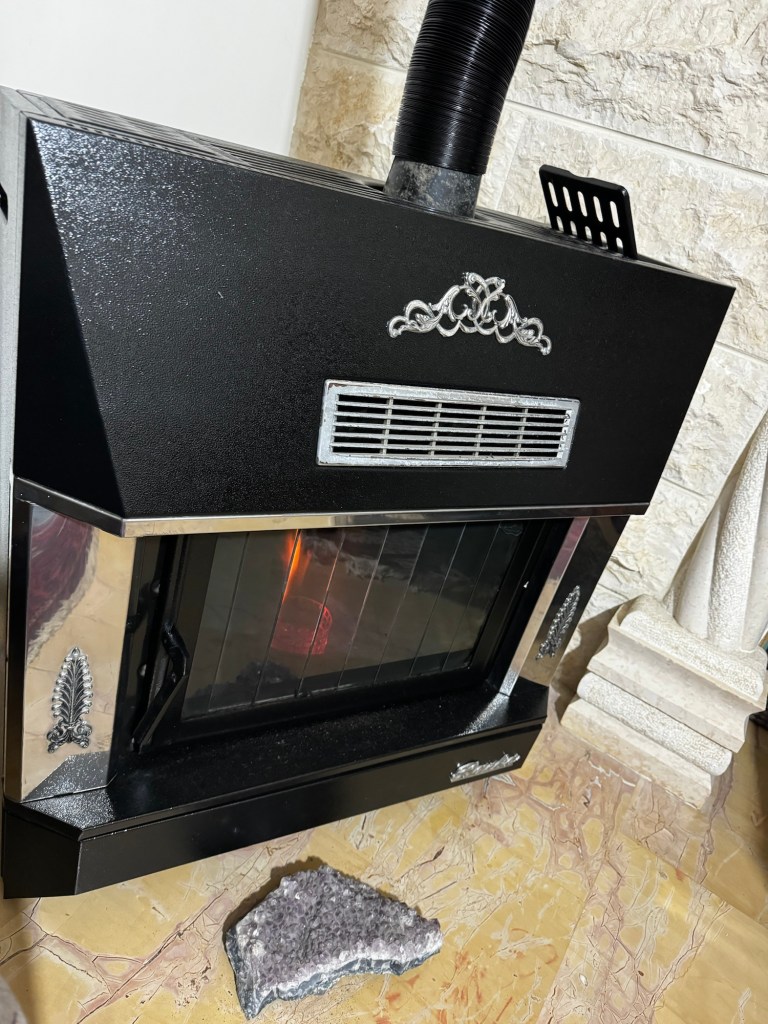
Two days after using the Olmar, I wanted to check on its fuel consumption. In other words, I have to estimate the amount of remaining fuel in the tank. I looked thoroughly at the Olmar to check how I could assess the fuel tank’s level. The tank is opaque and lacks any indication that marks the remaining level of diesel in it and thus assess the amount of fuel consumed.
The gasoline tank opening To estimate the amount of remaining diesel, I got a long wooden skewer and dipped it into the tank. To my surprise, the tank was deep, and the wooden skewer (we call it Sheesh in Arabic) fell into it. I was horrified; the wooden skewer might close the gasoline way to the combustion area entrance. I have to pull it out of the tank. After the initial attempt with a long wooden skewer failed, I employed a taller, hooked iron shish (which has a hook at its top) to help me get the wooden one from the diesel tank, which, to my dismay, also ended up inside. I lost two skewers, and keeping them in the tank will affect its functionality. Concerned about the impact on functionality and safety. How can I take them out? The opening on the top, where I dropped the skewers is narrow! My hand doesn’t fit into it!
Afterwards, The science coordinator’s “Ahaa ” moment has come. I employed a magnet and skillfully maneuvered it along the outer surface, successfully retrieving the iron stick. However, the wooden stick posed a more elusive challenge due to its non-magnetic property. But it is wood! And wood floats on the diesel! Putting my thinking cap on, I added more gasoline until the wooden stick floated to the surface, allowing me to retrieve it by hand. In these situations, I harnessed the principles of buoyancy and magnetism to overcome the unexpected setbacks in the maintenance of my heating apparatus. Thanks to the basic school physics that helped me solve real-life problems!Meta Title Tag: Using Magnetism and Buoyancy in Real Life Physics to Solve Everyday Problems | Science at Home
Meta Description: Explore how magnetism and buoyancy in real-life physics can be used to solve everyday problems and enrich your understanding of science at home.
Page URL: /using-magnetism-buoyancy-real-life-physics-solve-everyday-problems-science-at-home -
How can you easily transform students’ questions to inquiry based activities?
Students are born with the instinctive desire to ask questions. Their curiosity to understand the world around them drives them to seek answers that quench this curiosity and help them in their discovery journey. They start by asking their parents and friends, and later at school, they ask their teachers. The majority of their questions go in vain due to one of these reasons: parents either lack the time or the knowledge to respond to their children’s queries, they believe that the questions are above their kids’ age level, or they are simply tired of their kids’ questions. And as for teachers, many claim that students ask questions outside the syllabus, which wastes their class time. And in some cases, teachers don’t have answers to the kids’ questions.

These questions need to be nurtured and supported both by parents and educators. Parents have to encourage their kids to ask questions, and they have to find time to answer them. We realize that in some cases, parents don’t have an answer to their kids’ questions! Here, parents have to search for answers or consult a professional to provide them with adequate answers. Moreover, parents can simply guide their kids to raise these questions in class. On the other hand, teachers must view kids’ questions as teaching opportunities. They can transform them into inquiry-based questions to be investigated by the class. This will provide the students with a great sense of their autonomy and self-worth while simultaneously providing the instructor with an opening for an inquiry-based project.
The majority of teachers claim that it disturbs their lesson plan sequence when kids consistently interrupt them with their questions. Hence, some teachers ignore students’ questions, let them feel that their questions are dumb and silly, or, in the best case scenario, guide them to ask their questions later as they are not related to the addressed lesson. This will deter other kids from further asking questions and transform the class into a place where students can answer and engage in discussions without asking questions. In contrast, teachers must encourage students to ask questions. They have to value the questions and invest in them. One way to help teachers organize kids’ questions without humilating them is by creating a parking lot. This will help organize questions and keep space for kids queries that may later transform into investigable questions.
Why is it vital to encourage kids to ask questions? First, people who ask questions initiate a mental loop that helps reveal the answer, develop the question itself into a higher-order thinking question, or promote the question into an investigable one. Second, posing questions will bring the students’ concealed misconceptions to light and raise their self-awareness at the level of their learning. Thirdly, it grants a better comprehension of the concepts or phenomena. Moreover, asking questions restores positive relationships. Sometimes they reveal compassion, humility, and love. Additionally, it boosts kids’ critical thinking, logical reasoning, and social communication skills.
The big question is: how can we transform students’ daily questions into investigable ones? And at a more advanced stage, how can we instill in kids the skill of generating investigable questions?
Elevating and enhancing kids’ skills at asking questions is not an easy process. It needs structure and continuous training. First, start by building a community that values and praises questions asked by students in the same way it praises answers to questions asked by the teacher. Second, create situations and engage kids in activities that expose them to new experiences and observations. This will trigger their curiosity and push them to inquire. Third, ask them questions that initiate a series of questions and pose a “why?” followed by another “Why?” for their answers. This will deepen the level of conversation and provoke kids’ thoughts, leading to creative solutions and a better understanding of the phenomena around them. Moreover, your kids’ answers will give you insights into the areas of their concern and interests. Helping you to discuss the topics that appeal to them and giving you a solid ground for deep intellectual conversations.
Photo by Allan Mas on Pexels.com These prompted discussions and the series of questions will bring to the surface an inquiry question that experienced instructors will be able to identify and develop for an open inquiry-based lesson.
As parents or teachers, reflect on the time you initiated an intellectual conversation with your kids. Consider the last time you exposed your kids to open-ended queries or altered their closed-ended questions into open-ended ones. The majority of the questions we usually ask are answered with a “Yes” or “No” answer. Kids have a 50% probability of answering them correctly without even knowing the underlying concept. Hence, it is time to revamp the system and focus on initiating and embracing kids queries instead of hindering them. We have to ignite and sparkle the chain of questioning that builds the brain’s connections, boost kids’ conceptual thinking and cognitive skills, and enrich us with inquiry-based questions. Having students Investigate these questions has enormous benefits on their academic level and life skills.
-
Why should you never add water to the strong acid while diluting the acid? Why should you add the strong acid to the water?
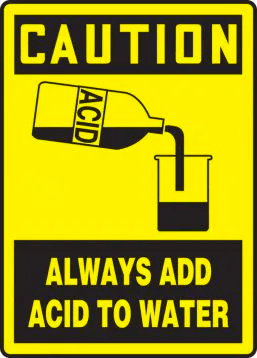
In the previous article, we addressed the reason behind never adding water to hot oil. Similarly, we have to avoid adding water to strong acids. Whenever you want to dilute a strong acid, add the strong acid to a beaker containing water, not the reverse.
The dissolution of strong acids in water generates heat (exothermic reaction). This heat is generated due to the enthalpy. The enthalpy of a solution can either be zero (athermic reactions- involving no exchange of energy), positive (endothermic reactions), or negative (exothermic reactions).
Why does this happen? What happens at the microscopic level and causes energy release?
As an Arrhenius acid molecules, the dissolution of a strong acid (HA) in water (H2O) releases a hydrogen ion/poton (H+). This hydrogen ion (H+) cannot exist by its own in the solution. When released, it directly combines with a water molecule (H2O) to form a hydronium ion H3O+
Hence, the dissolution of a strong acid (HA) in water is represented by the following equation:
HA +H2O -> H3O+ + A–
For example, hydrochloric acid, a strong acid, dissociates in water according to the following equation:
HCl +H2O -> H3O+ + Cl–
The heat is generated due to the hydration of the proton (H+) and specifically due to the hydrogen bond formation.
However, heat is generated in both scenarios: when you add acid to water or when you add water to acid. Why is it pronounced in the case of adding water to strong acid?
The moment you add water to the strong acid, you are creating a concentrated solution. Why is it considered concentrated? In this instance, the amount of water is small as compared to the amount of strong acid. This is not a scientific definition! However, it makes the reader imagine what is happening in the beaker at the microscopic level. The dissolution of water produces a large amount of heat energy that causes the water to boil and splash out of the container.
On the other hand, when you add a strong acid to the water, at first you are creating a very dilute solution (again, this is relative to the previous scenario). When heat is released in the diluted solution. It is dissipated in the large volume of water, and its effect almost vanishes.
An exemplary learning community.
