

-
Inquiry-Based learning versus Hands-On Learning.
Throughout the course of my educational journey, I’ve often encountered novice teachers conflating inquiry-based learning with hands-on learning. The majority of them categorize all hands-on pedagogical activities as inquiry-based learning. This stems from a misunderstanding of the differences and commonalities between the two instructional strategies. Hence, there is a need for rigorous identification of each one.

Teachers must realize that inquiry-based learning is a pedagogical approach that has its roots in scientific methods. It urges kids to transform a problem into an investigable question. They then navigate this question by formulating a hypothesis. Next, they gather information and conduct experiments. They collect data and analyze the results. Finally, they evaluate and draw conclusions. This process may be repeated at any point in the investigation process until kids reach a reasonable solution. Afterwards, they communicate their findings to the targeted audience. At each stage of inquiry-based learning, children’s innate curiosity drives them to continuously ask questions. They investigate to construct meaning and satisfy their thirst for knowledge. The investigable problem arises from a daily life observation, a provocative statement, an area of interest, teacher-generated prompts, etc., and hence the type of inquiry differs according to the level of complexity.
On the other hand, hands-on learning refers to any type of learning where students learn by doing. It involves actively participating in the learning process. Yet, in this type of learning, students can be doing their learning without investigating a problem and trying to find its solution. This type of learning involves activities that actively engage kids in the tasks. Examples include working with manipulative, building structures, and doing experiments. It does not necessarily include structured inquiry components.
Moreover, it is crucial to note that the two instructional strategies overlap. Inquiry is a form of hands-on learning in which the learner acts as a scientist. However, during many aspects of hands-on learning, students actively engage in the learning process without wearing the “inquirer hat” by asking “WHY?”, “How?” and “What if?” questions.

I understand the conflict at the level of novice teachers. Both hands-on learning and inquiry-based learning are built on the principle of learning by doing. Now that teachers realize inquiry-based learning has the scientific method at its base, it is easier for them to differentiate. Hands-on learning lacks this foundational connection.
As aforementioned, kids can go through a hands-on activity without having the mind-on part that triggers students’ critical thinking. Thus, inquiry-based learning transcends hands-on learning by empowering students to act like scientists. Still, many teachers are reluctant to embrace inquiry-based learning. There are mainly two factors for this. First, their educational background. These teachers studied with traditional teaching techniques and haven’t experienced inquiry-based learning as students. Second, teachers feel furious at the unexpected questions they face during inquiry-based learning. Some of these questions challenge teachers. In the course of my educational journey, I have encountered many teachers who, directly after being inspired by the inquiry strategy in a particular professional development program, adopted inquiry in their classrooms. Then these same teachers drifted back to the comfort zone of traditional teaching approaches. Here, they were less likely to face unexpected, off-script questions from students. They were more likely to have students controlled by them. But is this what we seek from education?
On the bright side, it is good to mention that many experienced teachers use inquiry-based learning in tandem with hands-on learning. This is a great opportunity for students. The hands-on part plays a significant role in revealing their misconceptions while they investigate the topic at hand.
Finally, the educational system must empower teachers to embrace and integrate inquiry-based learning. Especially “open inquiry,” due to its positive impact on students’ learning.
-
5 steps to make asynchronous learning student centered interactive learning.
Distance Learning has become the prevailing mode of learning for the majority of students during the pandemic. The two forms of distance learning are asynchronous learning and synchronous Learning.

Many people, after experiencing the synchronous learning for the previous two years, believe that it is beneficial. Especially if teachers plan and implement interactive sessions with the 5 E model and active learning strategies such as the Kagan strategies . On the other hand, many parents and students still consider asynchronous learning an ineffective learning and they classify it as assignments that must not introduce new concepts. How can we as educators change this misunderstanding?
What are the 5 steps to make asynchronous learning student centered interactive and effective learning?
Plan for asynchronous learning using the 5 E model.
# 1- Engage students using an interactive tool Google slide, Padlet, Jamboard, etc. by a brainstorming question.
Catch your students attention from the start. Post something they are curious about and interested in. Let them Brainstorm for the posted question in one place using any of the above tools. Your students will get inspired by their friends interaction!
#2- Push your students to explore the concept at hand.
Provide your students with online resources that help them explore safely. This can be: online articles, videos, recorded sessions, animations, stimulations, online games. etc. You can ask them to work individually or as team. They can record their findings on any of the the interactive tools listed above.
#3 Now it is the time to explain.
Who can do this part? The teacher, the student or any educational material can do this part.
You can provide students with a place to post their questions in the go. Afterwards, you can either ask for peer help to answer the questions or you can do it yourself. It is education! Always Light a fire!
#4 Here, comes the best part where you have to elaborate on the studied concept.
Extend and elaborate by connecting the concepts to daily life situations. Also, you can differentiate and elaborate based on students need and interest! Students exploration will inspire you in this step!
#5 Finally, the evaluation part.
Actually, I see this part in every step. It is an ongoing process that will help students in their learning and will help you to modify your teaching.
But , who said, you are the only one who will do this part?! Always think of self evaluation and peer evaluation!
Until my next blog, happy learning!
Neyoulla
-
Why should you never add water to hot oil?
One of the safety measures that almost everyone is aware of is to never add water over burning or boiling oil. What happens when you add water over burning or boiling oil? Why does this happen? What is the science behind it?

What happens when you add water to burning or boiling oil?
When water is added to burning or boiling oil, it causes the oil container to explode into a devastating fire as this Explosive Oil Fire video shows.
https://www.youtube.com/watch?v=PbgdRR4yj8Y
Why does this happen? What is the science behind it?
When water is poured over hot oil, it directly sinks to the bottom of the oil container. This happens due to:
1- density difference, the density of cooking oil is approximately 0.92 g/mL, this varies a little bit depending on the oil type, while the density of water is 1.00 g/mL
2- the immiscibility of oil and water, water and oil do not mix due to their different properties. Water molecules are polar while oil molecules are non-polar. Read through this article to know more about oil and water different properties.
Hence, when water is poured over hot oil, it directly sinks to the bottom of the oil container. Sinking water will heat up and immediately evaporate into steam and expand in volume. As a result, expanded water becomes less dense and moves up. Water movement and extra volume will push on oil and force it to explosively erupt in all directions. Afterwards, the scattered oil droplets will reach the fire source and ignite vigorously.
-
Effective Ways to Clean Tarnished Gas Stove Burners
Chemistry in the kitchen!
Cleaning gas stove burners is an intimidating process for everyone. We all want to remove the tarnish. We aim to remove the dull, almost black surface. Our goal is to restore the lustrous look of copper.
First, why does this black layer (tarnish) form on copper?
Metals like copper, brass, bronze, aluminum, magnesium, and neodymium are vulnerable to tarnishing over time. The outermost layer of the metal/metal alloy undergoes a chemical reaction—corrosion. Copper tarnishes like iron rusts. This occurs when the surface of the metal oxidises due to exposure to oxygen and moisture over time.
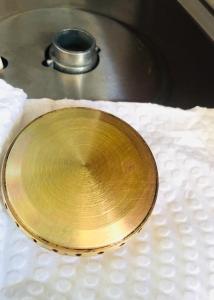
Copper (Cu) corrosion occurs in stages. It results in the black colour that appeared on the burners (see the tarnished burner below).
First stage:
Copper reacts with oxygen in the air to form copper (I) oxide (Cu2O) with brownish-red colour according to the following chemical reaction:

The tarnished burner 4Cu + O2 → 2Cu2O.
Second stage:
Cu2O reacts further with oxygen to form copper(II) oxide (CuO), which is black in colour according to the following chemical equation:
2Cu2O + O2 → 4CuO
The step-by-step cleaning process:
1. Remove the burner caps.
2: Place them in an old pot filled with water and one large spoon of white lemon powder.
3. Boil for 5 minutes.
4: Remove the burners while hot.
5: Simply wipe them with sponge and see the result. You can use an old tooth brush for corners.

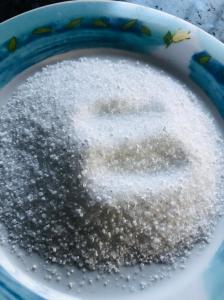
White Lemon Powder -
Why did my firewood burn with green flame?
I was frying potatoes over a campfire when I noticed the production of a green flame. Directly, the flame tests of the elements from chemistry classes came to my mind and I tried recognizing the source.
First, let us go over the flame test of chemicals: According to the qualitative analysis of chemical metal ions, the flame test visually determines the identity of an unknown metal ion according to the color of the flame. The heat of the flame excites the electrons of the metals ions into higher energy levels where they are energetically unstable. Hence, they tend to fall back down to their original energy levels, releasing energy as they do so in the form of light energy. This light has characteristic flame colors of different metal ions due to varying electron transitions.
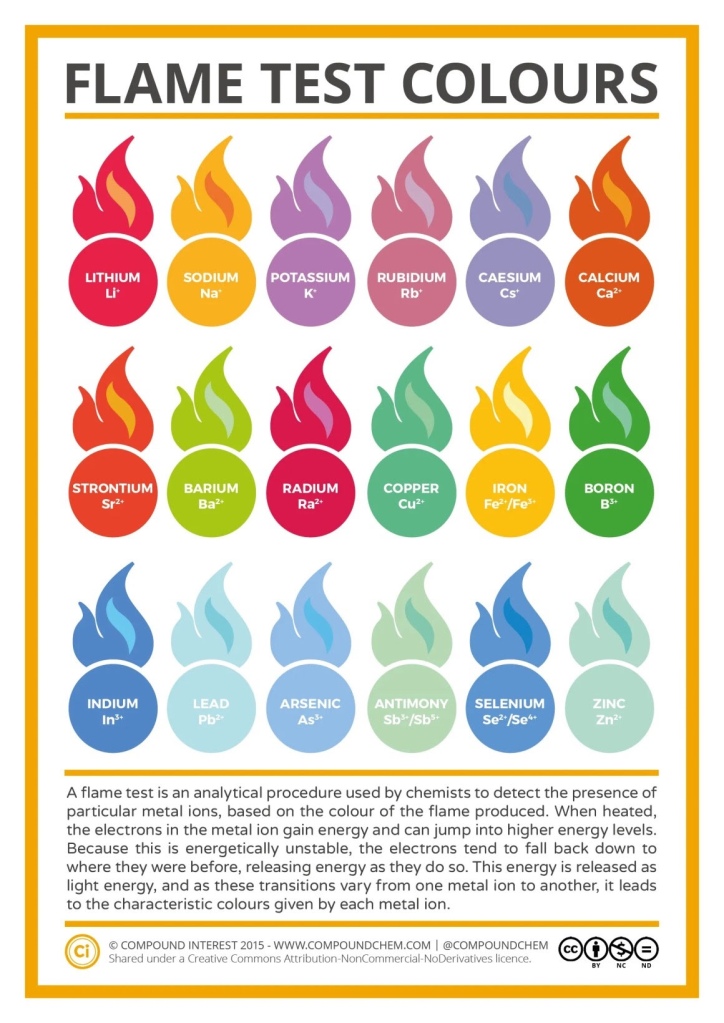
Flame test chart as retrieved from https://www.compoundchem.com/2014/02/06 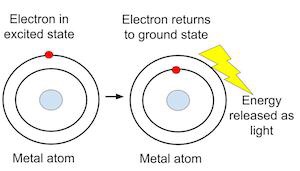
Light energy emitted while electrons return back to the ground state as Retrieved from. https://study.com/academy/lesson/zinc-flame-test.html As revealed from the flame test chart, boron ion B3+ and cupric ion Cu 2+ flame test give green flame. But where, how and why are these found in my woodfire?
At that day, I was burning in addition to wooden- logs the leaves of corns and most probably these were treated by a pesticide that has these chemicals as an active ingredients.

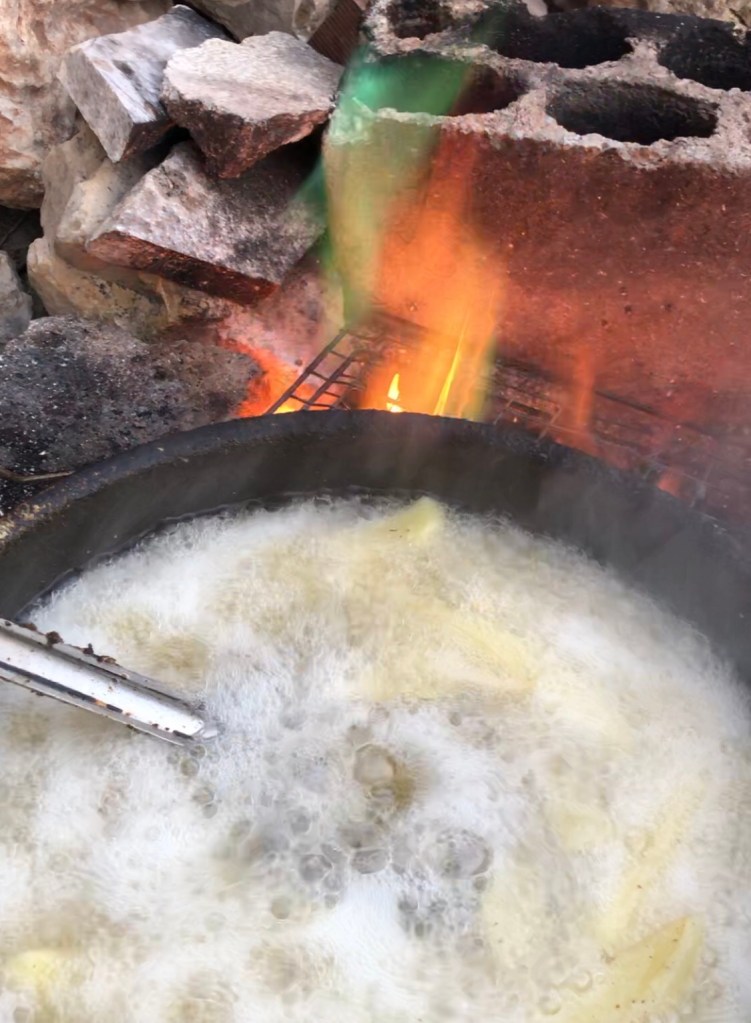
The green flame observed from the woodfire. What are the compounds that may be found in pesticides and leading the green flame?
According to NPIC ( National pesticide Information Center): “Boric acid and its sodium borate salts are active ingredients in pesticides used against insects, spiders, mites, algae, molds, fungi, and weeds.” and as we know Boric acid B(OH) 3 is a compound of boron, oxygen, and hydrogen. This justifies the possible presence of boron ion in the woodfire.
Adding to this, according to the Best Management Handbook : “Copper pesticides are a group of many different compounds that have some form of copper in common as the active ingredient. These compounds have protectant activity against several bacterial and fungal diseases”. Again, this justifies the presence of cupric ions in the woodfire.Next time, I have to reconsider burning the corn leaves due to the possible toxicity level of the released flame. Read more about the toxicity level of pesticides in Pesticide toxicity: a mechanistic approach.
-
Solar Eclipse -October 25,2022


Solar Eclipse as viewed in Lebanon at 2:03 pm on Tuesday, October 25, 2022 According to the NASA, partial solar eclipse takes place when the sun, moon and Earth are not exactly lined up. (NEVER look at the sun during any type of solar eclipse! Looking at the sun is dangerous. It can damage your eyes.)
-
Creativity killers!
You may have heard or may have read that “Schools are creativity killers”. But, do schools really “kill creativity”? If yes, several queries arise: Why do schools kill creativity? How do schools kill creativity? And, how can we as educators help reducing it?
George Land and Beth Jarman conducted a research on children in 1968. The researchers questioned 1600 kids aged 5 about the potential applications for paperclips. They retested the same kids again when they were 10 and 15.

Paperclips The results of the research were surprising. The percentage of participants who scored the “Genius Level” as reported by the article “What Paperclips Tell us About Creativity” was as follows:
98% of 5 years- olds
10% of 10 year olds
15% of 15-year-olds
This study and several more daily observations demonstrate how creativity is being killed off in schools. But, the question is why is this happening? Parents expect the reverse when their kids join schools and we ,as educators, do too!
The main reason for this goes back to the prevailing education system that was specifically designed in the 19th century to create the workforce needed by manufacturers. Some may claim that this educational system has witnessed regular reforms in recent years. It did, indeed! Significant adjustments has happened since that time. However, the main traditional structure is still there.
The primary role of students and teachers in the classroom has not been significantly altered through these years. Teachers are still doing a big part of their students’ learning for the majority of the learning sessions without even realizing it. How is this happening? Teachers consider the class a student – centered classroom since they keep on engaging their students through meaningful discussions and cooperative learning activities. However, If educators will measure the frequency of these meaningful discussions and their depth, they will notice how in most classes these discussions fall flat and end up with a discussion between the instructor and a small group of interested students leaving behind the other students. These left behind students will gradually feel disengaged and will either get bored or cause discipline problems. Hence, in reality the percentage of students who are actively engaged is minimal and moreover, the duration of this active engagement per individual is minimal too!
Adding to the aforementioned, teaching is still carried in a four walls classroom with the same table-chair student seating combination that was used a century ago. Even though, there is a trend towards making the classroom more student-centered than teacher-centered and towards providing students a bigger voice in their education. Again, the majority of schools advocate the traditional seating plan in which students sit with their backs to one another and their faces toward the instructor. In best case scenario, these students rearrange their seating to perform a group work, a pair work or any similar arrangement to cooperate with their classmates in answering a question or solving a problem. This may run for 10 to 20 minutes, after which students again go back to the original seating to engage with their teachers in wrapping up the work at hand or any similar Teacher-centered activity.
In the twenty first century and amid this massive advancement in technology, we must take into account what was considered as active learning the conventional and implement immense reformation in the education system to meet the demands of the present and the future. This starts by embracing a more flexible curriculum that is unrestricted by standardized examinations and that considers students co-constructors of knowledge. Adding to this, we have to adopt learning that meets students’ interest, need, learning style, age- level, and experienced reality. Don’t underestimate kids power! From my experience with kids, I have noticed that the thorough directions and instructions we keep on delivering to kids hinder their creativity! We overdo guiding kids to the extent of killing their creativity! We overdo following our pre-planning to the extent of suppressing kids’ innate curiosity! This is driven by the fact that we care about students’ grades more than their learning and about the end product more than the process itself. Sometimes, we have to give kids the lead in doing their learning and they will surprise us by reaching or even exceeding our set-out learning outcomes.
Afterwards, embracing the shift comes into action when we adopt the teaching strategies and techniques that require students to inquire, investigate and play during the learning journey, while teachers are facilitating and scaffolding their learning. This necessitates a learning environment that is designed to fulfill the needs of the students. Depending on the demands of the activity, learning may take place in the classroom, a factory, an industry, a bakery, a museum, etc
To that end, addressing teaching methods and strategies such as experiential learning, play – based learning, inquiry -based learning and project-based learning, to be at the core of our learning rather than an activity that is done from time to time will be a step stone to a bright future in education.
-
10 First Day of School Tips For New Teachers 👩🏫
Back to school is overwhelming for new teachers. While they will be eager for their first teaching experience, they will also feel anxious about dealing with 24 to 30 students in their classroom. These teachers may have attended classes as students- teachers in their practicum university courses. But, now the scenario is different! The class is their responsibility! Don’t panic! You will do great and you will learn a lot, even more than your have learnt at university while pursuing your major. To help you have a smooth and effective start, consider these 10 tips:
1- Plan, plan and then plan a little more. Plan for students with different academic levels, interests, learning styles and backgrounds. Teachers have to differentiate their planning to keep these students engaged and interested in their session. Consider having students who know everything you planned to address in your classroom. These students will feel bored in your session and will disturb your class if you haven’t planned ahead a challenging material addressed specifically for them.
2- Prepare an if-then list. It is good to jot down the challenges that you may face in the classroom or the questions that your students may ask and your expected solution/ answer for every point. This will help you be ready for the different classroom situations and will give you enough time and space to search and ask for the proper way to deal with each.
3- Ask an experienced teacher, your mentor or your coordinator to share with you their classroom experiences. This will benefit you gaining a better idea about your classroom expectations. Reading theoretical literature of best practices is highly important for a new teacher. However, listening to common school and common classroom teachers will give you adequate insight into the real students you will teach. This is because these teachers know well your students’ cultural and environmental background. Hence, reading literature teachers’ first day best practices and listening to the school teachers’ experiences will let you know where you are going . It is said: “If you don’t know where you are going, you’ll end up someplace else.” – Yogi Berra
4- Establish your classroom rules and consequences from day one. It is recommended to build these rules with students and make them your reference for the whole year. Your consistency in following up the rules and the consequences is the key element for your classroom management.
5- Prepare all the materials that you may need in the classroom ahead of time. You can have a box for day one and another for day two, if needed. It is crucial to be organized and ready for your session. Students will be aware of all these details and will trust you more when they notice your readiness and organization skills.
6- Get to know your students well from day one. This, helps you revise your plan for next day. You may need to amend in accordance! Don’t worry, this is normal! Your lesson plan must be flexible and you may modify your plans based on your classroom needs and requirements. Also, it is highly recommended to start memorizing your students names from day one. Afterwards, calling them by their names will reveal your care and respect to every individual in your classroom.
7- Give clear instructions and be consistent in making the students follow them. Check this link for the best way to deliver classroom instructions.
8- Introduce yourself in a friendly and smart way. The first impression you give to your students is crucial in building healthy relationship with them. I recommend sharing briefly your academic background. This helps in building trustful and respectful teacher-student relationship.
9- Be ready for plan B especially when it comes to technology. Practice using the school platform and any other needed tool before you come to class.
10- Share with your students your expectations regarding their assignments, assessments, copybooks’ organization, etc. and walk the talk from day one.
Finally, believing in yourself and your abilities will be the biggest aid in all your endeavors.
-
10 reasons for implementing Inquiry-Based Learning in your classroom.
Teachers should strive to implement Inquiry Based learning (IBL) in their classrooms for the following 10 reasons:
1-IBL is a student -centered approach rather than a teacher-centered approach.
2- Enhances students’ autonomy and empowerment.
3- Fosters students’ motivation and passion for learning.
4- Makes real-world connections.
5- Creates life-long learners.
6- Hones students’ natural curiosity.
7- Builds inquirers who are able to ask questions and seek answers through the inquiry process steps.
8- Develops students’ twenty first century skills such as critical thinking, collaboration, communication, etc.
9- Promotes in-depth knowledge.
10- Elevates students’ self-efficacy and self- confidence.
Isn’t worth it to implement inquiry lessons in your classroom? Wait for our series of inquiry based lessons!

-
The stick insect!
Look at this photo? What do you see?
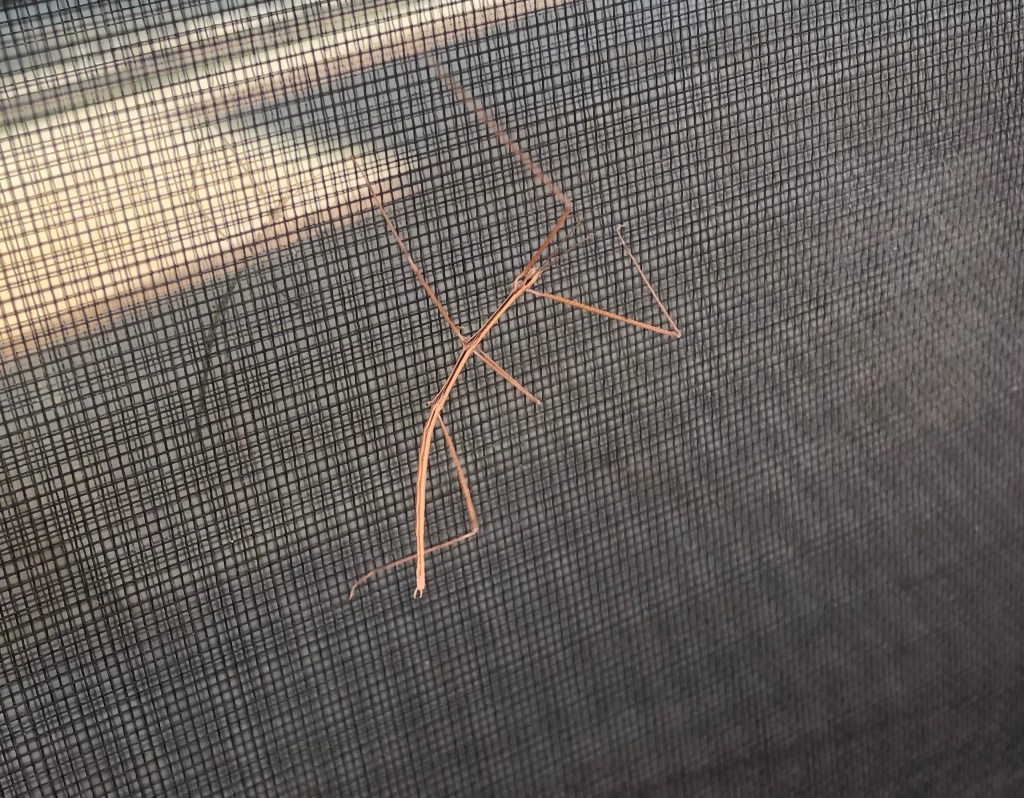
A stick on the door mesh screen. At first glance, I saw a stick. I came close to catch it and throw it away! But, all of a sudden it moved! Huh, it is not a stick! Here, I realized it is an animal that camouflaged to a stick! I moved it to the ground to see it on the floor. It changed its color to blend again with the floor! How amazing is it to observe this animal! As an adult, I was fascinated by it! How about kids?

I am sure that if kids see it moving, they will think that the wind is moving it! They will not easily believe that it is an animal! It is blending in a perfect way to protect itself from predators! I googled this type of animals to know more about it. Thank God it is a herbivore and it’s not poisonous. Or else, kids will get hurt from it. I do believe that God has created all this mix in it for a purpose!
And here a call to the science teachers worldwide: be sure your students are exposed to such observations and experiences before you introduce the camouflage concept at class! Also, parents can have an effective role in this by encouraging their kids to play in the outdoors and to explore the natural environment in their vicinity. Isn’t it more healthy for the proper development of your kids to leave technology behind and enjoy their time in nature?!
If you are interested to know more about camouflage and specifically about the stick insect, read these interesting articles.
https://www.ranker.com/list/animals-that-can-change-color/katherine-ripley
https://kidadl.com/facts/animals/stick-bug-facts
-
Inquiry- Based Learning: The steps of IBL and its four types.
What is Inquiry Based Learning?
Inquiry Based Learning (IBL) is a pedagogical approach through which one asks or formulates testable questions and investigates them seeking the solution. It triggers students curiosity and develops their critical thinking skills. IBL emphasizes the students’ role in the learning process. The level of Inquiry Based Learning depends on the degree of the students’ autonomy in the learning process.
What are the steps of Inquiry Based Learning?
- 1- Pose a question/define the problem.
- 2- Conduct research/ Plan and carry out the investigation.
3- Collect data. - 4- Analyze and interpret data/information.
- 5- Share the results .
- 6- Draw out a conclusion.
In spite of these steps, teachers can approach the process in variety of ways depending on the studied topic.

What are the different levels of Inquiry Based Learning?
1- Confirmation Inquiry
Teacher: poses a testable question and provides students with the procedure (design) that they have to go through to a pre-determined and known end result.
Students: Proceed with the investigations till they reach the end results and confirm them.
The confirmation inquiry reinforces prior knowledge.
2- Structured Inquiry ( directed inquiry)
Teacher: poses a testable question and provides students with the procedure (design).
Students: Students perform the investigation following the procedure prescribed by the teacher.
This is a cookbook inquiry. Students follow a recipe step by step till they draw a conclusion.
3- Guided Inquiry:
Teacher: Teacher only poses a testable question for students to investigate. Teacher scaffolds students’ investigations.
Students: design an experimental procedure to investigate the question.
4- Open Inquiry
Students: take the lead in proposing and investigating their own questions.
Teacher: Supports students throughout the learning process.
What type (s) of inquiry do you implement in your classroom? How can we you take it into a higher level?
-
Living thing, Non-living thing or what?
I have always been connected to the nature of science NOS, to the questions that students ask about controversial scientific topics and to the debates we hold in the science classroom. However, this time I had this debate at the personal level with my nephew Zayd – a 6 years old grade one student. The two of us were watering the walls of a newly built garden room.

Cement Wall I highly recommend creating a role for kids in home duties while taking all safety measures into consideration. This helps them thrive and learn by observation ( Watering concrete few days following the pour strengthens it since the chemical reaction that helps strengthening the concrete needs water). The time we started watering the wall Zayd said: “Why are you washing the wall?”
Me: Actually, I am not washing it! I am watering it!
He looked with his curious eyes and said ” Why? Does it need water?”
Me: Yes, it needs water! Water strengthens the concrete added to join the concrete blocks that are used to build the wall.
Zayd: But it is non- living thing! Why does it need water?
Zayd related this to his science lesson. He studied this year about Living things and non -living things and this is the definition of Non- Living things in his Fusion Book!
Non Living Things Here, I said “Yes, it needs water to become stronger! But it doesn’t grow and reproduce!
Zayd said: “The wall was short two days ago! And now, it is tall!” He laughed and said: : “Is the wall growing?
Me: ” Yes, you are right! Now, it is taller than the previous time we saw it. Do you know why does it become tall?”
Zayd: “The worker stacked the blocks above each other and the wall became long”
Me: ” Yes, You said it! the worker stacked them 🙂 So, it is not growing by itself!
Here, I noticed from his sparking eyes that he got convinced by my answers!👍
Being science majored, I was able to follow up with the curious kid ( Zayd) till the end. However, many parents and teachers are killing kids’ curiosity. Parents by saying “you will know this later” and teachers mainly by redirecting them to the lesson plan process and procedure. We, as educators must nurture kids’ curiosity as it is a way to enhance their creativity. From my experience, I found that the question parking lot is a good strategy to follow up with students’ questions while at same time staying on the lesson plan track.
An exemplary learning community.
